
 by
by In recent years, artificial intelligence (AI) has revolutionized the way we interact with technology in general. What once seemed like science fiction, or required specialized hardware and complex configurations, is now simple, intuitive, and, above all, increasingly common. So common, in fact, that it’s becoming part of our daily lives, no longer something that feels distant or futuristic.
Whether it’s searching the web, studying, shopping online, or planning a trip, AI is already there, making our digital lives simpler and more accessible. A few years ago, we saw the rise of virtual assistants like Google Assistant, Siri, and Alexa becoming integral parts of our devices and environments. In parallel, technologies such as augmented reality and virtual reality have also gained prominence, leading to products like VR headsets, self-driving and self-parking cars, and wearable devices that accompany us throughout the day, rings that constantly monitor our health, earbuds with live translation, glasses that record and transcribe in real time, and, of course, classic voice command integrations. All these devices have opened doors to new dimensions of interaction with the technological world.
As AI continues to evolve, its ability to understand user context and daily routines to deliver truly personalized experiences has pushed major tech companies to “think outside the box.” Sharing images, documents, or even streaming live video across the globe now serves purposes beyond social engagement, such as optimizing factory operations, simulating real-world scenarios like climate events, conducting scientific research, advancing healthcare, robotics, and engineering, and driving incredible new discoveries yet to come. In this ever-innovating landscape, one form of interaction has stood out from the beginning for its naturalness and power: voice interaction.
Beyond breaking accessibility barriers, voice interactions are becoming increasingly popular and are already being applied in real-world scenarios, even replacing certain jobs, such as drive-thru attendants, call center agents, translators, writers, and even musicians, with AI-generated bands. Instead of spending hours on hold waiting for a human representative, we can now simply say what we need and receive an immediate response.
This shift not only enhances user experience but also brings significant technical challenges. Behind this convenience lies the complex task of ensuring that voice agents are effective, accurate, and capable of handling the intricacies of human language and the technological hurdles that come with it.
LLMs and AI Agents
Let’s start with the core of any intelligent system: Large Language Models (LLMs). These are language models trained on massive amounts of data, capable of understanding what you say (or write), processing that information, and generating coherent responses aligned with user expectations. They act as universal translators, able to grasp nuances, context, and even emotional tone in human language. Think of LLMs as the brain behind your agent, whether it’s voice-based or text-based.
An AI agent, on the other hand, can be thought of as a “bot” equipped with access to information and predefined instructions that allow it to understand the context in which it operates, process information, using the LLM to interpret what was said, and then make programmatic decisions such as how to respond, which tool to use, or how to guide the user’s conversation before finally taking action.
We’ve been familiar with voice assistants for some time, but they were often limited in functionality and struggled with complex tasks. At best, they could answer simple questions or execute basic commands. With the advancement of LLMs, however, we can now build voice agents that are far more capable to understand natural human language, maintaining long conversational contexts, learn from previous interactions, and even remembering relevant information.
The voice component itself relies on two key technologies: Speech-to-Text (STT) and Text-to-Speech (TTS). STT is responsible for converting your speech into text, in simple terms, it “listens and writes.” The resulting text is then passed as input to the LLM. After the LLM generates a response, TTS performs the reverse process, converting that text back into speech.
Today, there are several models capable of producing remarkably natural-sounding voices. Together, these technologies enable fluid, human-like interactions where you can simply speak and receive responses as if you were conversing with another person.
It’s worth noting that, just like LLMs, both STT and TTS technologies have evolved rapidly. Most now support language-specific features such as accents, slang, dialects, emotional tone, and more. They can also handle challenging conditions, like background noise, overlapping voices, pronunciation differences, and grammatical inconsistencies, accurately distinguishing between, for example, a phone number and a barcode to transcribe what the user is saying correctly.
If you think voice interaction is still something far off in the future, think again. Check out this list of how voice agents are already being used across different industries:
- McDonald’s ends AI drive-thru trial as fast-food industry tests automation
- 76% of large automating firms plan to swap workers with AI: CFO survey
- Recruitment platforms Glassdoor and Indeed lay off 1,300 employees, replacing them with AI: Will there be a time when bots will be hiring bots?
- Wendy’s Is Making Big Changes to Its Drive-Thrus This Year — and Customers Are Divided
- China's AI-powered humanoid robots aim to transform manufacturing
Under the Hood: How Voice Agents Work
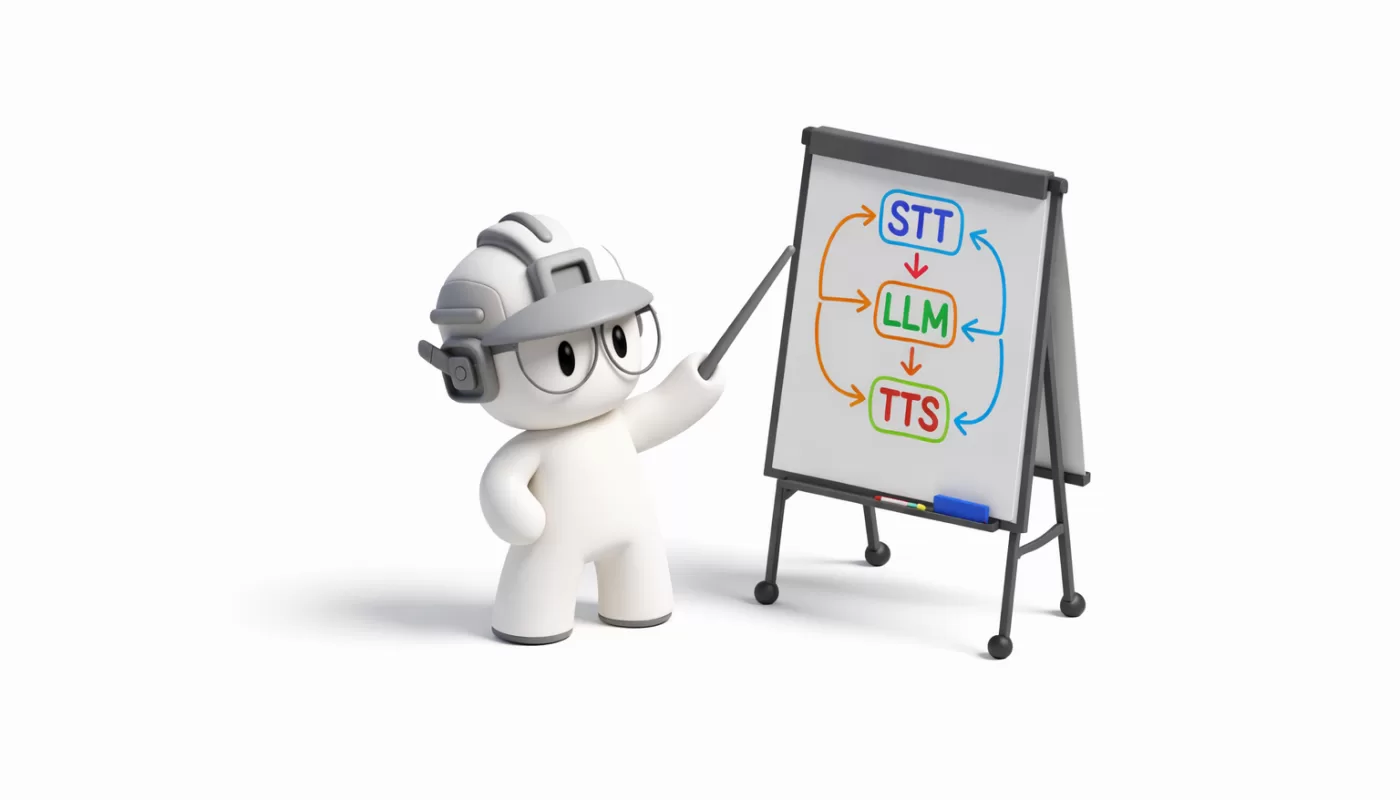
As mentioned earlier, the magic behind voice agents lies in the combination of three core technologies: STT → LLM → TTS. These components must work together quickly and in sync to create an experience that feels close to a natural human conversation. Latency, the delay between each step, must be minimal; after all, no one enjoys an assistant that takes too long to understand or respond, right?
To make this possible, the conversation travels across the internet almost in real time through high-speed communication channels such as WebRTC or WebSockets. These digital highways ensure that your voice reaches the agent and that the response returns to you within milliseconds, creating the impression of a seamless, uninterrupted dialogue.
These “bridges” connecting the components are known as transport layers. They ensure that your audio is delivered to the STT system and that the TTS output is sent back to you. Take a look at the diagram below to better understand how this architecture works:

Featured Open Source Project: Pipecat
The source of this image comes from Pipecat, an open-source tool designed specifically for one purpose: creating conversational voice agents in an incredibly simple way. Pipecat acts as an orchestrator that manages everything from the voice transport layer, automating the process of converting your audio into text, sending that text to an advanced language model, forwarding the model’s response for text-to-speech conversion, and finally returning the generated audio to its original source, all with minimal latency.
Two major advantages of Pipecat are that, being open-source, it gives you full access to the code, allowing you to customize, adapt, and innovate according to your needs. It also offers easy integration with leading platforms such as OpenAI, Gemini, DeepSeek, and others. In addition, Pipecat has an active developer community that shares projects, tips, and organizes events to promote and improve the tool.
Creating Your First Voice Agent with Pipecat
This section might look like one of the longest, but in reality, it’s shorter than it seems. If you prefer, you can follow the Quickstart Guide directly from the Pipecat website.
There are only a few steps required to bring your first voice agent to life. To begin, make sure your development environment has Python 3.10 or later installed, along with uv, a package manager for Python. You’ll soon see how simple it is to integrate all the necessary services in practice.
Before moving forward, you’ll need to create a few API keys for the services we’ll be using. For STT, we recommend Deepgram, which provides a generous amount of free credits to test their service without spending anything.
For the LLM, you can use OpenAI, you might already have an account, but if not, you can create one for free. However, you’ll need to enable developer features, which may incur additional costs depending on usage. Alternatively, you can choose other platforms such as Google’s Gemini or others supported by Pipecat.
Finally, for TTS, you can use Cartesia, which also offers a good amount of free credits for testing.
It’s worth noting that some providers offer both TTS and STT services. If you prefer to use a single provider for both, that can simplify the setup process. Realistically, creating all these accounts and generating the API keys will likely be the most time-consuming part, but once you have them, the rest is straightforward.
In a directory of your choice, create a file named .env and add your credentials as shown in the example below:
DEEPGRAM_API_KEY=your_deepgram_api_key
OPENAI_API_KEY=your_openai_api_key
CARTESIA_API_KEY=your_cartesia_api_key
In the same directory, create a file named Requirements.txt and add the following line:
pipecat-ai[webrtc,deepgram,openai,cartesia,runner]
python-dotenv
loguru
With a terminal open in the directory where you created the files above, run the following command to set up the virtual environment and install the project dependencies:
  python -m venv venv
  source venv/bin/activate  # On Windows, use `venv\Scripts\activate`
  pip install -r Requirements.txt
Before moving forward, here’s a quick explanation of what each dependency does:
pipecat-ai: The core of Pipecat, which includes the voice agent orchestrator.webrtc: Provides real-time communication support via WebRTC (transport layer).deepgram: Integration with Deepgram’s Speech-to-Text service.openai: Integration with OpenAI’s language models.cartesia: Integration with Cartesia’s Text-to-Speech service.runner: Tools for running the Pipecat server.
python-dotenv: Library for loading environment variables from the.envfile.loguru: Logging library that simplifies event and error tracking.
Now, let’s get to the interesting part!
The code for our voice agent is essentially composed of two main functions (which you can modify as needed). The first one acts as the entry point to start the conversation, the transport layer, which in this case will be WebRTC. To establish a connection between the client and the server, the module expects a method named bot. Therefore, for everything to work correctly, you must define this function with the proper name. Consider the following implementation:
async def bot(runner_args: RunnerArguments):
  """Main bot entry point for the bot starter."""

  transport_params = {
      "webrtc": lambda: TransportParams(
          audio_in_enabled=True,
          audio_out_enabled=True,
      ),
  }

  transport = await create_transport(runner_args, transport_params)

  await run_bot(transport, runner_args)
Notice that the webrtc parameter is defined as a lambda function that returns a TransportParams object. This object specifies configuration details such as whether audio input and output are enabled. We use a lambda here because Pipecat allows you to define multiple transport channels, such as WebRTC, WebSockets, or others. This way, Pipecat can determine which transport channel to use based on the incoming request and then call the appropriate function to configure that channel with its respective settings.
The second main function is run_bot, which is where the entire voice agent logic resides. This includes defining the services used, setting up the prompt, configuring the agent’s tools, defining the execution pipeline, and other key details. Consider the following implementation:
async def run_bot(transport: BaseTransport, runner_args: RunnerArguments):
  stt = DeepgramSTTService(api_key=os.getenv("DEEPGRAM_API_KEY"))

  tts = CartesiaTTSService(
      api_key=os.getenv("CARTESIA_API_KEY"),
      voice_id="71a7ad14-091c-4e8e-a314-022ece01c121",  # British Reading Lady
  )

  llm = OpenAILLMService(api_key=os.getenv("OPENAI_API_KEY"))

  messages = [
      {
          "role": "system",
          "content": "You are a friendly AI assistant. Respond naturally and keep your answers conversational.",
      },
  ]

  context = LLMContext(messages)
  context_aggregator = LLMContextAggregatorPair(context)

  rtvi = RTVIProcessor(config=RTVIConfig(config=[]))

  pipeline = Pipeline(
      [
          transport.input(),  # Transport user input
          rtvi,  # RTVI processor
          stt,
          context_aggregator.user(),  # User responses
          llm,  # LLM
          tts,  # TTS
          transport.output(),  # Transport bot output
          context_aggregator.assistant(),  # Assistant spoken responses
      ]
  )

  task = PipelineTask(
      pipeline,
      params=PipelineParams(
          enable_metrics=True,
          enable_usage_metrics=True,
      ),
      observers=[RTVIObserver(rtvi)],
  )

  @transport.event_handler("on_client_connected")
  async def on_client_connected(transport, client):
      logger.info(f"Client connected")
      # Kick off the conversation.
      messages.append({"role": "system", "content": "Say hello and briefly introduce yourself."})
      await task.queue_frames([LLMRunFrame()])

  @transport.event_handler("on_client_disconnected")
  async def on_client_disconnected(transport, client):
      logger.info(f"Client disconnected")
      await task.cancel()

  runner = PipelineRunner(handle_sigint=runner_args.handle_sigint)

  await runner.run(task)
In this basic implementation, we start by instantiating the STT, TTS, and LLM services using the respective API keys defined in the .env file. Next, we define the agent’s initial prompt, in this case, a simple instruction for the agent to behave as a friendly assistant.
We then add the initial message to the LLM’s context and extract a context aggregator to manage both user and assistant messages. The context_aggregator allows structured interaction with the conversation’s context, keeping user and assistant messages organized.
Next, we define the RTVIProcessor (Real-Time Voice and Video Inference), which is responsible for processing additional information during the conversation, such as performing real-time audio analysis (for visual interfaces like avatar animations, waveforms, and more) and streaming LLM responses in real time.
After that, we create the Pipeline, which defines the sequence of processing steps the agent will follow. Each stage in the pipeline represents a specific transformation or action, from user input to agent output. Think of the pipeline as a series of steps the agent executes to process the conversation, regardless of the transport channel or the type of frame being handled.
In Pipecat, frames represent packets that contain important information of a specific data type. There are various frame types, and each pipeline stage can handle different ones, for example, audio frames, text frames, image frames, system (or control) frames, and context frames.
The tools that interpret these frames are called Frame Processors. Just like the RTVIProcessor, you can create your own Custom Frame Processors to perform specialized tasks during pipeline execution. Common examples include real-time keyword detection, silence detection, or even custom logging.
Finally, we define our task, which encapsulates the pipeline and its configurations into a job to be executed by the PipelineRunner.
Before starting the task, we also define custom callback events, such as when a client connects or disconnects, where we start and end the conversation, respectively. Once everything is set up, all that’s left is to start the PipelineRunner to begin the interaction.
To make everything work, combine both functions along with their respective imports into a file named server.py. At the end of this file, we’ll also define the entry point to start the Pipecat server, as shown in the example below:
import os

from dotenv import load_dotenv
from loguru import logger

from pipecat.frames.frames import LLMRunFrame
from pipecat.pipeline.pipeline import Pipeline
from pipecat.pipeline.runner import PipelineRunner
from pipecat.pipeline.task import PipelineParams, PipelineTask
from pipecat.processors.aggregators.llm_context import LLMContext
from pipecat.processors.aggregators.llm_response_universal import LLMContextAggregatorPair
from pipecat.processors.frameworks.rtvi import RTVIConfig, RTVIObserver, RTVIProcessor
from pipecat.runner.types import RunnerArguments
from pipecat.runner.utils import create_transport
from pipecat.services.cartesia.tts import CartesiaTTSService
from pipecat.services.deepgram.stt import DeepgramSTTService
from pipecat.services.openai.llm import OpenAILLMService
from pipecat.transports.base_transport import BaseTransport, TransportParams

load_dotenv(override=True)

async def run_bot(transport: BaseTransport, runner_args: RunnerArguments):
  stt = DeepgramSTTService(api_key=os.getenv("DEEPGRAM_API_KEY"))

  tts = CartesiaTTSService(
      api_key=os.getenv("CARTESIA_API_KEY"),
      voice_id="71a7ad14-091c-4e8e-a314-022ece01c121",  # British Reading Lady
  )

  llm = OpenAILLMService(api_key=os.getenv("OPENAI_API_KEY"))

  messages = [
      {
          "role": "system",
          "content": "You are a friendly AI assistant. Respond naturally and keep your answers conversational.",
      },
  ]

  context = LLMContext(messages)
  context_aggregator = LLMContextAggregatorPair(context)

  rtvi = RTVIProcessor(config=RTVIConfig(config=[]))

  pipeline = Pipeline(
      [
          transport.input(),  # Transport user input
          rtvi,  # RTVI processor
          stt,
          context_aggregator.user(),  # User responses
          llm,  # LLM
          tts,  # TTS
          transport.output(),  # Transport bot output
          context_aggregator.assistant(),  # Assistant spoken responses
      ]
  )

  task = PipelineTask(
      pipeline,
      params=PipelineParams(
          enable_metrics=True,
          enable_usage_metrics=True,
      ),
      observers=[RTVIObserver(rtvi)],
  )

  @transport.event_handler("on_client_connected")
  async def on_client_connected(transport, client):
      logger.info(f"Client connected")
      # Kick off the conversation.
      messages.append({"role": "system", "content": "Say hello and briefly introduce yourself."})
      await task.queue_frames([LLMRunFrame()])

  @transport.event_handler("on_client_disconnected")
  async def on_client_disconnected(transport, client):
      logger.info(f"Client disconnected")
      await task.cancel()

  runner = PipelineRunner(handle_sigint=runner_args.handle_sigint)

  await runner.run(task)

async def bot(runner_args: RunnerArguments):
  """Main bot entry point for the bot starter."""

  transport_params = {
      "webrtc": lambda: TransportParams(
          audio_in_enabled=True,
          audio_out_enabled=True,
      ),
  }

  transport = await create_transport(runner_args, transport_params)

  await run_bot(transport, runner_args)

if __name__ == "__main__":
  from pipecat.runner.run import main

  main()
With everything set up (and your virtual environment running), you can start the server using the following command:
python server.pyThe first startup may take around 30 seconds, but subsequent runs should be much faster. Once the server is up and running, you’ll see a message in your terminal:
🚀 Bot ready!
   → Open http://localhost:7860/client in your browser
That’s it! Open the provided link in your browser, click “Connect” in the top-right corner, enable your microphone, and start talking to your voice agent!

If you want to take things further, you can easily deploy your agent using Pipecat Cloud by Daily. In the official quickstart repository, you’ll find preconfigured files that let you deploy your voice agent to the cloud with just a few clicks. Alternatively, you can read more about this process in the Deploy to Production guide.
Notes
- Remember to monitor your API usage, especially when using paid services; to avoid unexpected costs.
- Pipecat supports a wide range of STT, TTS, and LLM providers, so feel free to explore different options based on your project’s needs.
- This is just a basic example to get started. Pipecat offers many advanced features such as tool integration, knowledge base (RAG) support, prompt customization, and more.
- Pipecat also supports video and image processing, allowing you to expand your agent to handle multimedia interactions, including creating an animated avatar to visually represent your voice agent.
- Be sure to explore the official Pipecat documentation to learn more about its capabilities and how to customize your voice agent for your specific use case.
Additional Resources
When exploring Pipecat as a tool for building voice agents, reading the documentation is a great way to start, but some people learn best through working examples. If that’s your case, check out the repositories pipecat-ai/pipecat-examples and pipecat-ai/pipecat/examples/foundational. There, you’ll find a variety of interesting implementations, such as adding background noise to calls, detecting inactive users, using function calling (tools), recording audio, detecting speech turns, and much more. You’ll also find examples using different SDKs for both server and client sides. Definitely worth exploring!
Additionally, a few complementary tools can be quite useful during development. For example, the Voice UI Kit provides a set of React components that help you build web interfaces for your voice agents.

Another handy tool is Pipecat Tail, which adds a dashboard to your console, allowing you to monitor real-time metrics for your voice agent, such as latency, token usage, and more.

For those who prefer command-line tools over graphical interfaces, there’s the Pipecat CLI, which provides scaffold commands to create and deploy projects directly from the terminal, and Whisker, Pipecat’s official debugger that lets you visualize, in real time, the flow of frames being processed through your voice agent’s pipeline.

A Starting Point for Something Bigger and More Complex
When developing their first voice agent, many developers face a common question: which tools should they use? Should they go with an open-source solution like Pipecat, or opt for private platforms such as VAPI or Telnyx? While paid platforms often provide solid support, they can fall short when you need something highly specific.
You’ve probably encountered situations where customization is limited, costs scale quickly, or you end up locked into a platform. If you’re the kind of developer who dislikes relying on black-box systems or being tied to closed ecosystems, and you want full control over your project, from source code to the final user experience, then Pipecat is the right tool for you. And since it’s open source, you might even find a great opportunity to contribute to the community.
Regardless of your choice, it’s crucial to understand the technical challenges you might face. It’s essential to list all the features your software needs and compare available tools to determine which ones best meet your requirements. Doing this upfront can save you a lot of time and frustration later. After all, it’s never pleasant to realize that the tool you chose doesn’t support a critical feature, or that its usage costs make it impractical to launch your product, whether due to infrastructure expenses or recurring subscription and consumption fees.
In today’s fast-paced AI landscape, new tools emerge almost daily. Many rely on third-party services, while others attempt to build their own solutions. In practice, companies like Twilio, Deepgram, and ElevenLabs provide services for building AI-powered voice agents, but they often come with customization limitations. Pipecat, on the other hand, being open source, offers unmatched flexibility, allowing you to adapt the code to your specific needs.
Conclusion
Whether you choose open-source tools or paid platforms, understanding the complexity behind these technologies is essential to creating a high-quality voice agent.
Learning how data flows through the transport layer, how your voice is converted into text, and how that text is transformed back into audio responses are fundamental steps in understanding how these agents work.
It’s also important to recognize that technological advancements are happening faster than ever. A great example is the emergence of workflow creation for LLMs, features that enable a more visual approach to building and orchestrating agents. After all, curiosity and questioning are the driving forces of innovation.
Finally, I’ll leave you with a thought-provoking question for anyone venturing into developing their first voice agent:
Which approach is better for a multi-agent project: a generalist agent with access to multiple tools, capable of retrieving information on various topics using RAG and conversing about anything, or several specialized agents, each focused on a specific domain with its own tools and knowledge base, transferring the conversation when needed?
In my opinion, it largely depends on the use case, but I’d love to hear your thoughts on this, especially regarding performance, scalability, cost, and user experience. Share your perspective and let’s discuss!
We want to work with you. Check out our Services page!


