How to Easily Deploy Your Web App to Firebase Hosting
Getting to know Firebase HostingTable of Contents
There are different stages in application development. Some of these stages are nicer than others, and some are necessary, like deployment.
The deployment stage might not even be the most exciting part, I mean, designing and implementing an entire queue processing can be more interesting, for instance. Although it’s not the most exciting part, the deployment has its value.
Deployment is the last step of a development cycle (e.g. sprint) and carries a sense of "making something happen" (especially if it’s being done for the first time). It feels like receiving a medal after running a marathon.
In this post, we’ll see how to deploy a web application to Firebase Hosting from scratch.
Our Application
Our application is just a simple ReactJS app. You can use any of the frontend frameworks like Vue, Angular, and so on. You can even use pure HTML and JavaScript if it’s a better choice for you.
To create an app like ours follow the link to create a new react app
What is Firebase Hosting?
From their documentation we have:
Firebase Hosting is production-grade web content hosting for developers. With a single command, you can quickly deploy web apps and serve both static and dynamic content to a global CDN (content delivery network). You can also pair Firebase Hosting with Cloud Functions or Cloud Run to build and host microservices on Firebase.
Set up Firebase CLI
The first requirement is to have a Google Account. It’s needed to access the Firebase Console.
Since you have an account you will be able to create a Firebase Project. This article is not intended to help you with Firebase Project creation. The steps are easy, you just need to give a name and tap next all the time.
In your machine install the Firebase CLI using the command
npm i -g firebase-tools
Check if it was installed successfully running the following command.
firebase --version # It should display the version (e.g 9.18.0)
Now you will need to execute one more command to authenticate with Firebase. This command is
firebase login
It will open a tab on your browser. The opened page is to authenticate using your Google Account. This authentication is needed to connect with your Firebase project on the console.
Once you are authenticated you can list your projects running firebase projects:list. Your newly created project should appear here.
Set up Firebase Hosting
Go to your project and run the command below.
firebase init hosting
You’ll see something like shown below.

Select the option to Use an existing project, select the desired project, and go to the Hosting Setup.

Define the public directory
The first one is about your public directory, here you need to put the path to your application assets, in ReactJS (as for Vue) it means the build folder (this folder contains your assets after running npm run build).
NOTE: It depends on your settings, and it could vary based on what you’re using to build your web application. In Angular, the folder is dist for instance.
Roughly saying you just need to put the folder where your index.html is placed on, either you using any framework or not.
The content of this folder will be uploaded to Firebase Hosting to be available at a specific address in the form YOUR_PROJECT_ID.web.app.
The rewrite policy
After defining the public directory you will be asked if you want to configure the application as a SPA. Selecting yes will define a rewrite rule to redirect all requests to the index.html. Our application is a SPA so we’ll also select yes.
GitHub Actions integration
You’ll be asked if you want to set up a GitHub Action on your project. It’s a good option to automate your deployment process, but it’ll be not covered by this article. You can find more information about GitHub Actions and Firebase Hosting at the references of this article.
The fourth question
In our example we had a fourth question, it happened because we already had an index.html in our build folder (the public directory).
The CLI usually creates a default index.html if it doesn’t exist and asks for overwriting when this file is already present on the public directory. In our, we declined the overriding since we want to use our index.html.
After the setup, the files .firebaserc and firebase.json will be created in your directory.
The .firebaserc is simple, it contains information about your Firebase project. Check the content of ours below.
{
  "projects": {
    "default": "codesilvablog"
  }
}
The firebase.json, in this case, will contain the Hosting configuration. Look at the content below.
{
  "hosting": {
    "public": "build",
    "ignore": [
      "firebase.json",
      "**/.*",
      "**/node_modules/**"
    ],
    "rewrites": [
      {
        "source": "**",
        "destination": "/index.html"
      }
    ]
  }
}
Let’s detail it more:
- public: The already known public directory
- ignore: Contains the paths that don’t need to be uploaded
- rewrites: Array of rewrite rules. Here is the policy we defined on setup, the redirecting to index.html.
Launch it
Now you’re done. All settings you need were made, let’s publish our web application.
To deploy it, make sure you have your build files and run the command below.
firebase deploy
If everything went well you’ll might a result like the one shown below.

Note: It already has an SSL Certificate.
Access the URL and see your application available to the whole world.
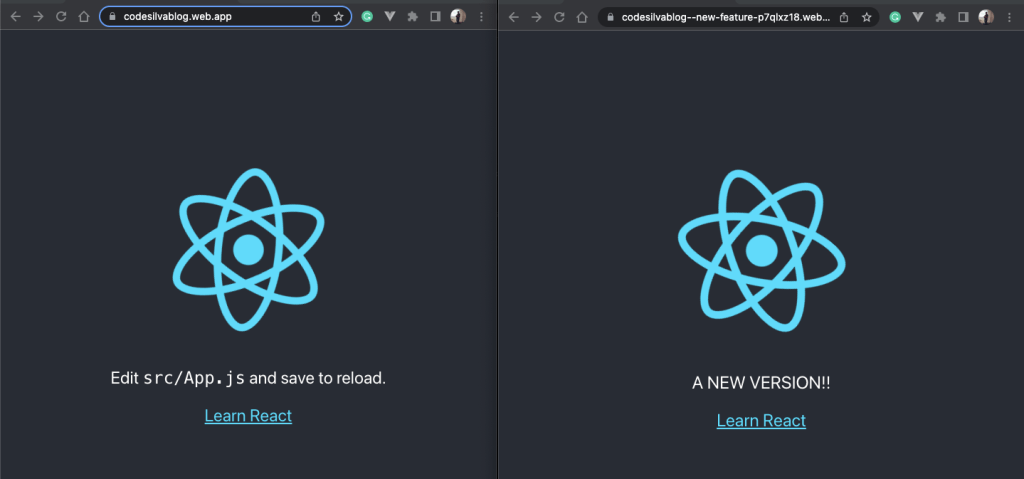
Use channels to validate your changes
Sometimes, before sending an update to the production we need to validate with a set of users, kind of A/B testing. It’s an easy task to do in Firebase Hosting. You only need to deploy differently, with a different command.
To see it working, change your code, build it again (if needed), and deploy it again using the following command.
firebase hosting:channel:deploy new-feature
It will perform the deployment as we’ve seen before, but it will be isolated from your main address. After the deployment, you’ll see something like
✔ hosting:channel: Channel URL (codesilvablog): https://codesilvablog--new-feature-p7qlxz18.web.app [expires 2022-03-13 13:12:06] [version 9f4f58ea6f07fd79].
Note the new URL and the information about expiration. It’s how channels work, they have an expiration time, this channel we’ve just created is valid for seven days. If you need you can set up an expiration passing the option --expires followed by the period. The period can be days (d), weeks (w), or hours (h). So we can do:
firebase hosting:channel:deploy new-feature --expires 20d (replace d with w or h and figure out what happens)
Yet, you can see your channels on the Firebase Console, on the Hosting page.
Both versions of our application are displayed below.
Summary
We’ve got to know a bit more about Firebase Hosting by deploying our ReactJS SPA application. Once you set up the Firebase CLI and the Hosting what you’ll need to do to perform the deployments is just run a single command. To make your daily life easier, you can also put it in the package.json file, on the scripts section.
There are more cool things I consider interesting to know, and I plan to bring them to a different post. Until then, you can find out more by yourself. Check the links at references and have fun with Firebase Hosting.
Let me know if you have any questions and if this post was useful, consider sharing it with your friends.
That’s all. See ya!
References
- Firebase Hosting Quickstart – https://firebase.google.com/docs/hosting/quickstart
- Firebase Hosting and GitHub Actions – https://firebase.google.com/docs/hosting/github-integration
- Hosting Channels – https://firebase.google.com/docs/hosting/manage-hosting-resources
We want to work with you. Check out our Services page!
 Edy Silva

