

 by
by We all know how maps are important. They are always there. Maps, since thousands of years ago, have been an essential way of extracting information. We can cross oceans from one end to another or find a new café in our neighborhood, we can see how gigantic the Amazon rainforest is and how it’s gotten smaller in the last few years. We can see ideographic data of a population living in one area and plan our next steps to assist this population. Whatever the case may be, maps are useful because their purpose is to display a simulated view of the world, and with this view and information, we can plan our next steps.
The challenge
Imagine we are the mayor of a city, and our citizens are complaining about the lack of green areas for them to enjoy a good time with their loved ones. Planning a city can be difficult, especially if you don’t know what you’re talking about. So, how do we find out? How can we discover in a neighborhood how many public parks we already have? It would be nice if we had a map for it. But wait, what if we could have one? What if we created an app that, by selecting a coordinate on the map, we could see all the nearest parks, allowing us to plan the next ones in spaces we know are available?
You can check all the code used in this article here
Planning to action
In one of our blog posts, we had a nice introduction of how can we set up a Mapbox app with some features like drawing customized polygons and markers. But for this to work, there are some requirements.
- Searching – We need a map (obviously), and we need a way to find our city on it. So, we need a map with a search box, where we can type the city’s name and retrieve the park’s information.
- Retrieving Data – We also require information about said map. Usually, a government API of some kind could return to us the data about all the public structures presented in a city. But having in mind that these APIs may require some security to use them, we’ll use Nominatim. Nominatim is an open-source geocoding API that has what we are looking for.
- Pinpointing – We have to select a specific point on the map to see all nearby parks. After selection, the API should return all data about the surrounding parks.
- Selecting an Area – It’s nice to display all the parks, but once we find an empty spot that could make for a very good-looking park, we could draw a polygon selecting the chosen area. This would make it much easier to showcase our park in a meeting with the mayor’s office.
- Map Interaction – Obviously, we can make mistakes when selecting stuff, so we need a few buttons that will allow us to interact with the map, like placing a marker or removing all markers on the map.
So, how do we start? I say we start by certifying we have everything we need to make the app functional. So let’s take a look at how Nominatim works.
Understanding the API
You can read Nominatim’s documentation here and discover lots of nice ways to do things, but since we’re focusing on our scenario, we’ll start by getting all data for the parks from the GeoJSON – the most common geolocation format.
To get it, we need to build a query capable of retrieving all data based on our location. But there is a problem: Nominatim doesn’t support latitude and longitude as query parameters. You can read about all supported parameters, but at the moment of writing this article, to get info about parks in a neighborhood we would need something like
https://nominatim.openstreetmap.org/?addressdetails=1&q=park+in+vila_madalena
which, in theory, would return all the parks inside Vila Madalena, a neighborhood in São Paulo. But wait, we only know our coordinates, how can we retrieve our neighborhood? Our city? Our state? We could use reversed geolocation for that.
https://nominatim.openstreetmap.org/reverse?format=geojson&lat=${lat}&lon=${lng}&zoom=18&addressdetails=1
So, by giving the latitude and longitude to Nominatim’s API and using the reverse geolocation path, we can retrieve data like this:
{
  "type": "FeatureCollection",
  "licence": "Data © OpenStreetMap contributors, ODbL 1.0. https://osm.org/copyright",
  "features": [
    {
      "type": "Feature",
      "properties": {
        "place_id": "18512203",
        "osm_type": "node",
        "osm_id": "1704756187",
        "place_rank": "30",
        "category": "place",
        "type": "house",
        "importance": "0",
        "addresstype": "place",
        "name": null,
        "display_name": "71, Via Guglielmo Marconi, Saragozza-Porto, Bologna, BO, Emilia-Romagna, 40122, Italy",
        "address": {
          "house_number": "71",
          "road": "Via Guglielmo Marconi",
          "suburb": "Saragozza-Porto",
          "city": "Bologna",
          "municipality": "Bologna",
          "county": "BO",
          "state": "Emilia-Romagna",
          "postcode": "40122",
          "country": "Italy",
          "country_code": "it"
        }
      },
      "bbox": [
        11.3397676,
        44.5014307,
        11.3399676,
        44.5016307
      ],
      "geometry": {
        "type": "Point",
        "coordinates": [
          11.3398676,
          44.5015307
        ]
      }
    }
  ]
}
Now, we know what we need. We have things like country, state, and city… All we need to do is pass the right arguments and search for our parks. But there is another problem: for a small city, instead of returning a key named city, it may return a key named town. A small neighborhood might not even have a key, only for its suburb (as per the example below). So, for our first version of the app, we’ll use basically three keys that will show us where we are with good precision. We’re using state, municipality, and suburb. Combining these three keys, we have something like this
If you open that link (I’ll not put the whole response here since it’s too big), we’ll get the 50 nearest parks in the state of São Paulo, inside the city of São Paulo, and inside the Perdizes neighborhood. Great! So, now what?
Handling our map
As pointed out in our last article about Mapbox, mapboxgl is created with something like
map.current = new mapboxgl.Map({
    container: mapContainer.current,
    style: "mapbox://styles/mapbox/streets-v12",
    center: [lng, lat],
    zoom: zoom,
    });`
But this only creates the map. We still need the search bar (for searching our city) and the drawable area (to draw our parks). Thankfully, Mapbox already solves this for us with addControl, which allows us to use Mapbox plugins and add them to our map. We’re using Geocoder to give us the search bar and MapboxDraw for the drawings.
map.current.addControl(
    new MapboxGeocoder({
    accessToken: mapboxgl.accessToken,
    mapboxgl: mapboxgl,
    marker: false,
    })
);
map.current.addControl(
    new MapboxDraw({
    displayControlsDefault: false,
    controls: {
        polygon: true,
        trash: true,
        },
    })
);
This should give us something like this

Handling events
At this point, we have the skeleton of our app. But we need to understand how we can deal with the clicking events. We’ll have three types of event clicks:
- The button "Select neighborhood" will allow us to select a place in our neighborhood and add a marker to it.
- The button "Clear markers" will clear all currently present markers.
- And clicks on the map itself. So, once we’ve clicked on "Select neighborhood", the next click on the map should search the API for our parks and create visible markers.
useEffect(() => {
    if (!map.current) return;
    //This useEffect handles the actions on the map by creating arrow functions
    const moveHandler = () => {
      setLng(map.current.getCenter().lng.toFixed(4));
      setLat(map.current.getCenter().lat.toFixed(4));
      setZoom(map.current.getZoom().toFixed(2));
    };

    const clickHandler = async (event) => {
        // We created canAddCustomMarker state to check if the button is pressed and parkMarkers is the state responsible
        // for having all the parks that we'll get from the API
      if (canAddCustomMarker && parkMarkers.length === 0) {
        // If canAddCustomMarker is true and we have no parkMarkers, we create a marker for the place that we selected
        const marker = new mapboxgl.Marker()
          .setLngLat([event.lngLat.lng, event.lngLat.lat])
          .addTo(map.current);
        setSelectedNeighboorhoodMarker(marker);

        //We get all the data using the coordinates of the place. We call this variable allFeatures because in GeoJson, the objects are called
        //"features". You can find more info in geojson.org
        const allFeatures = await getNeighboorhoodMarkers(
          event.lngLat.lng,
          event.lngLat.lat
        );

        //If the request is succeeded we create markers on the map for each park
        if (allFeatures) {
          const allParks = allFeatures.features.reduce(
            (allMarkers, feature) => {
              const marker = new mapboxgl.Marker()
                .setLngLat([
                  feature.geometry.coordinates[0],
                  feature.geometry.coordinates[1],
                ])
                .addTo(map.current);
              return [...allMarkers, marker];
            },
            []
          );
          setParkerMarkers(allParks);
          setCanAddCustomMarker(!canAddCustomMarker);
        }
      }
    };

    //The events are listened by map.current.on
    map.current.on("move", moveHandler);
    map.current.on("click", clickHandler);
    return () => {
      //since canAddCustomMarker state is changed when we click the button, we can prevent bugs by cleaning the event listeners
      //with map.current.off. Otherwise, everytime we click on the button and then click on the map, our function would be executed twice.
      map.current.off("move", moveHandler);
      map.current.off("click", clickHandler);
    };
  }, [map, selectedNeighboorhoodMarker, parkMarkers, canAddCustomMarker]);
The result is something like this:

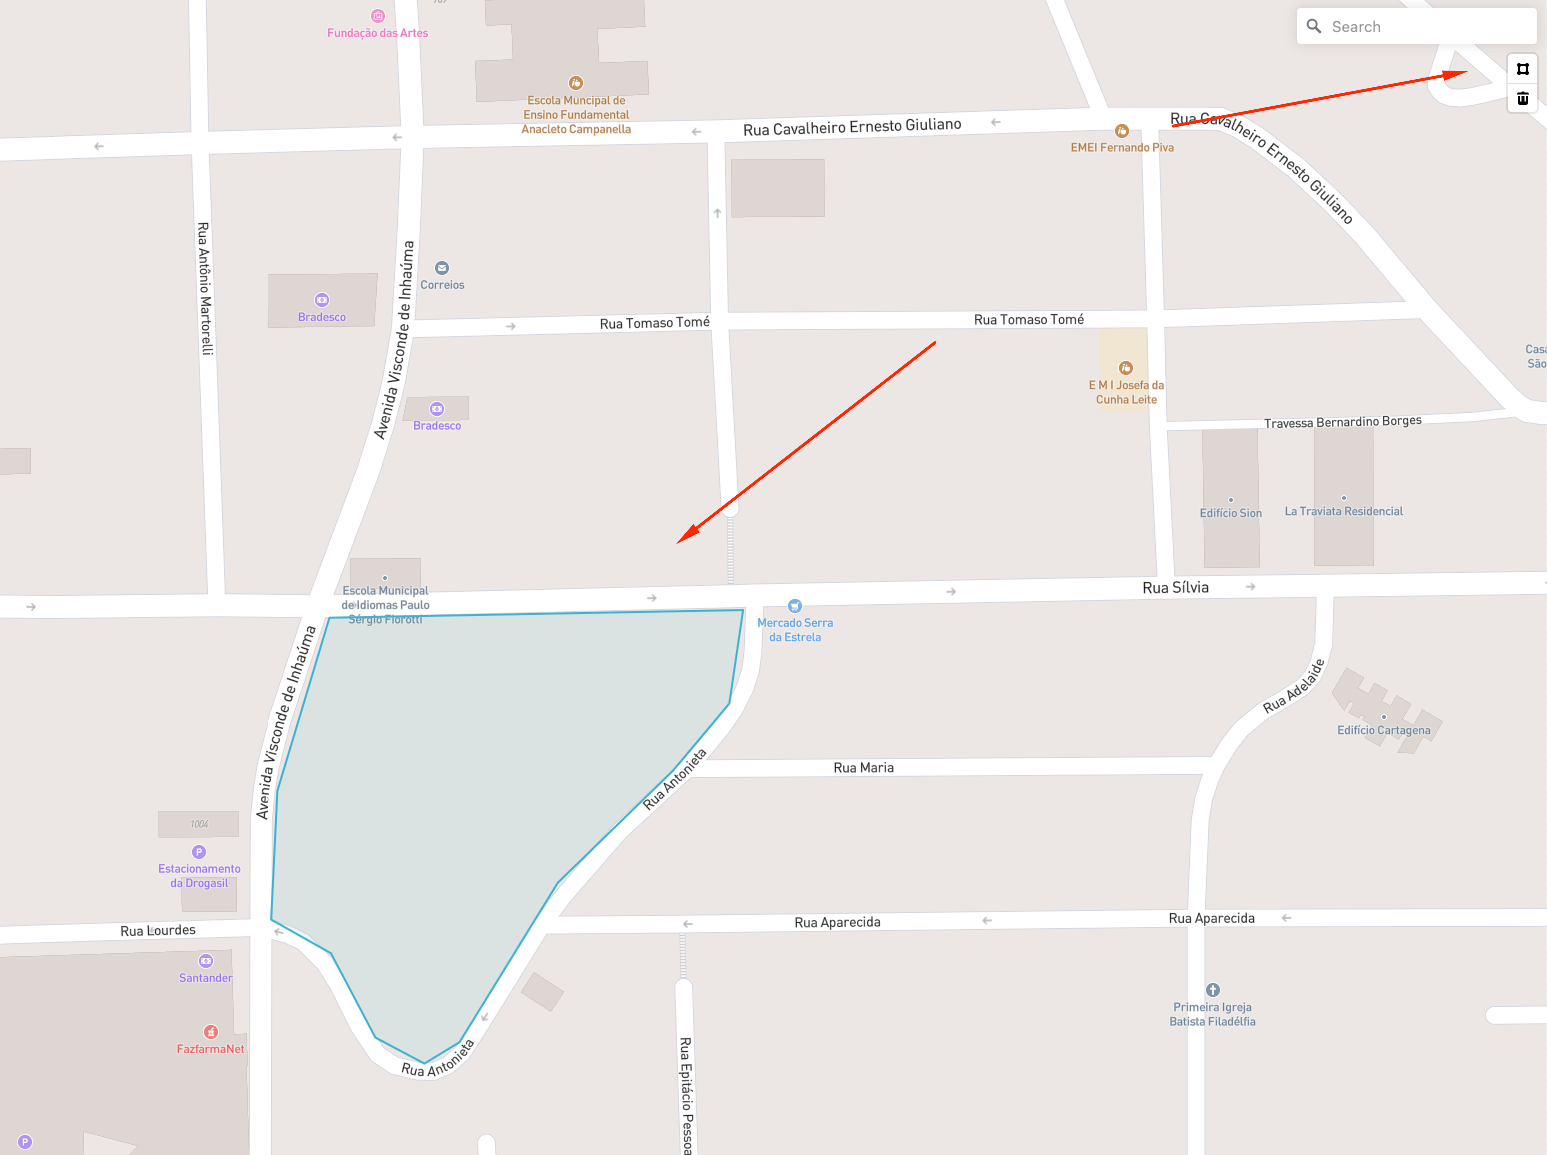
And now, finally, we can draw by hitting the drawing tool
Next Steps
In this article, we made a bunch of things, but most of them are screaming for a better implementation. First, we don’t have tests. How can we tell that our app won’t break if we make a change, like creating another action button? Second, we don’t have error handling. We’re trusting that Nominatim will give us perfectly working solutions, but if it doesn’t, probably all of society will suffer for missing the amazing park we’re planning. And third, we’re currently handling all our logic in just one hook. We can do better, don’t you think? So, for our next article in this series, we’re going to:
- Create unit testing for our app (we need to guarantee that the markers are created, deleted, and so on)
- After we have our tests and the security that we’ll be warned if our changes break the app, we can do a nice refactoring, such as including typescript to help guarantee our data has the correct format.
- Divide our app into smaller components and use styled-components/styled system instead of just one .css file handling everything.
Hope you enjoyed it! See you in our next article!
We want to work with you. Check out our Services page!


